Showing posts with label art activity. Show all posts

Tuesday, October 29, 2024

Montessori-Inspired Hands-On Activities for Chumash Bereishis

Montessori-Inspired Hands-On Activities for Chumash Bereishis!


Tuesday, October 22, 2013

Adorable Well Project for Parshas Chayei Sara

For this weeks Parshah, my son was set on making a REAL Well (one that he could actually put water into and draw it out with a bucket) but he also wanted to use his craft sticks which he really enjoys doing crafts with.

After a little research, I figured out a great idea where he could have a 'real' well and use his craft sticks too... what do you think?


Here are some of the supplies we used:


Here are the steps to making your own Well:
1. Get an empty plastic water bottle and cut two squares out of the top sides of the water bottle.
2. Using craft sticks, glue them around the bottom of the water bottle as well as one on each side. We put rubber bands around the craft sticks while it was drying to keep them from sliding off. You can use a glue gun too, but my little guy wanted to do the gluing himself.
3. Once dry, using a hole puncher, punch a hole in the plastic next to the tops of each craft stick used to support the bucket (see photo above).
4. Using a thin stick (we used a broken paint brush) tie a string/piece of ribbon to the top and attach a mini bucket (we used a mini mug) to the bottom of the string.
5. Stick the stick with the bucket through the holes, fill the well up with water, and voila! There you have it :)

Hope you are enjoying your week,
Always,

Sunday, September 1, 2013

Adorable Rosh Hashanah Mobile


Okay, I made this for my kids last night and gave it to them to do today while I baked a bunch of Challahs. I didn't know it when I made it, but not only did they LOVE doing this, but it baught me like 45 MINUTES of time to bake!

Here it is with instructions, enjoy!

Rosh Hashanah Mobile- Click Here to print it out
1. Make sure to print it out on card stock or at least glue it onto some harder paper. You can also just laminate it if using regular paper.
2. Color each picture and explain how each picture connects to Rosh Hashanah
3. Cut out each picture including the Rosh Hashanah sign
4. Using a hole puncher, punch a hole at the top of each picture (you dont need to use every picture, up to the kids)  and punch holes in the circle on the Rosh Hashanah sign
5. Using string or yarn, tie it to each picture and connect it to the sign. Tie string to the top of the sign to hang it up on the wall. My 4 year old got frustrated threading the yarn through the holes so he just taped the yarn to each picture. It all worked out!

 Have fun and Happy Yom Tov prepping!

Sunday, December 16, 2012

Fun and Pretty Art Project/Gift

Just thought I would share this adorable art project we did using the magnetic wooden alphabet letters from Melissa and Doug, some craft glue and LOTS of glitter!


As much as I would love to tell you that my kids use those magnetic letters all the time to make words, they really don't. And so we have a fridge filled with these magnets and today we decided to collect the letters of our names, paint them with glue and dip them in glitter (the surface).

They came out gorgeous and now each of the kids have their names up on the fridge all sparkly for all to see. We even made some for our cousins which we will send as gifts.

Below are some of the supplies we used as well as some other supplies you can use in this project.


Coming up this week is a fantastic Giveaway to a fantastic Jewish website... so stay tuned, you just may win:)

Hope you all had a wonderful Chanukah,
Always,
  

Thursday, July 26, 2012

More summer fun and some preps for the school year...

 Giant bubble fun... 
Mix 12 cups water, 1 cup dish soap, 1 cup corn starch and 2 Tbsp baking powder.
Let it sit for at least an hour. The longer you let it sit, the better the bubbles. Give it a good mix, get some fun bubble wands, sit back, relax, and let the kids have a ball:) 


Take a bunch of crayons, line them up on a piece of paper, tape them down. Get a hair dryer and blow close to crayons and watch it melt. Kids thought this was AWESOME. 


Now as a very proud New Yorker, and growing up in the city, my knowledge of gardening was very limited. A good friend of ours helped us plant a garden and the kids have been LOVING it. 

I love the fact that they can actually SEE where it comes from, hence when making a bracha, it makes sense. They see the tomatoes growing from the ground, hence, "ha-adama". It's a very cool, hands on approach to teach kids the correct blessings on foods as opposed to just coloring pictures of foods with the same bracha.

Here is our tomato plant. This tomato was picked and eaten by my daughter just seconds after I took this photo. 

 Our strawberry bush- this strawberry still needs a few more days, but these are the most amazing, sweetest strawberries you have ever tasted.

Our pineapple. Now you can understand why we say "ha-adama" on pineapple:)

Beets..

Now back in this post I began working on our continent boxes. It's a good thing mom and dad were world travelers before we met and got married and between my hubby and me we have a some great photos of ourselves from all over the world. 

I went through these photos and took out a bunch and put them in each continent box. The only continents we both didn't get to were Australia and Antarctica. The kids love seeing photos of us in these places, it makes it very real to them. 

Here is what we have so far, as I find things, I add them to the boxes:

~Israel~

(okay, Israel is not a continent, but it's our land so it deserves it's own box:)
* a map
* Take Me to the Holy Land (you can get it here)
* Personal photos of mom and dad in Israel
* Photos and pictures of various places and events that happened
*Israeli flag
* Miniature Menorah and Shekel and Silver Jerusalem
* Israeli Soldiers
* A police pin
* A Tanya printed in Israel


~Antarctica~
 * A book on Antarctica which I got here
* 2 books on Penguins
* A book I made with images I tore out of an issue of the National Geographic
* Photos of Jewish scientist David Wakil lighting the Menorah in Antarctica
*Some cute miniatures: scarf, hat, snow flake, iglue, sled. sweater. snowman and polar bears. I know we have some penguins somewhere, just have to find them:)
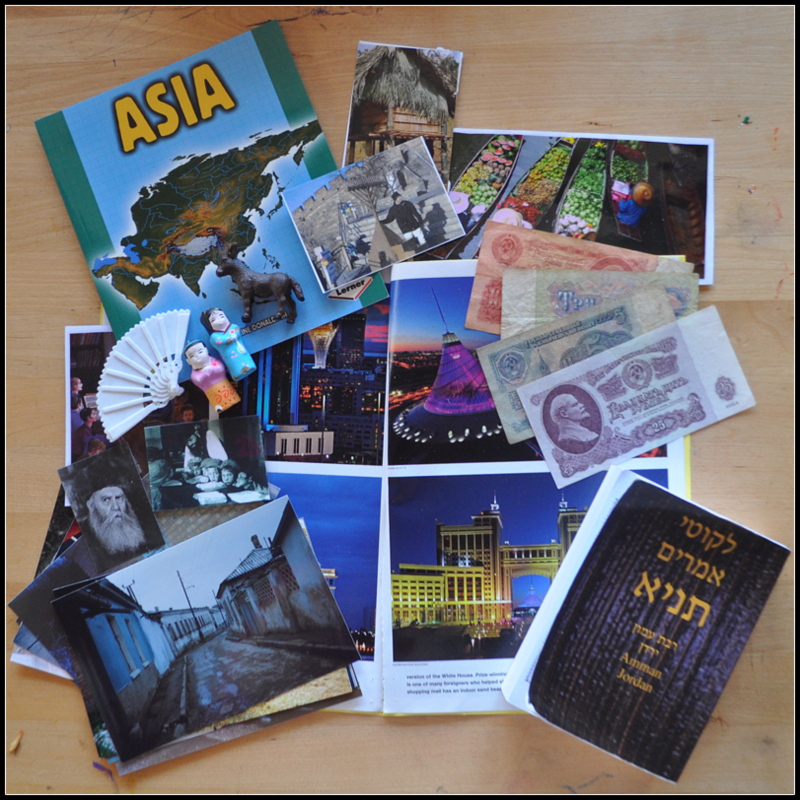

~Asia~
* Russian money
* Photos of my husband in Russia
* Photos of famous Rabbi's from Russia as well as Yeshiva boys learning in Yeshiva's in Russia
* Book on Asia
* Photos of Thailand and China
* A Tanya printed in Jordan
* Miniatures of 2 Asian people and a fan
(my husband spent time in India, we are trying to dig up those photos:)


~Europe~
* Book on Europe
* Photos of mom and dad in various countries in Europe
* Photos of Menorah lightings around Europe
* Tanya printed in Italy and France
* A Picture Book of Anne Frank which you can get here, with photos of mom at the Anne Frank House in Amsterdam
* Book on Raoul Wallenberg, he helped the Jews in WW2

I have Australia, Africa, North and South America and will post photos when I get a chance.
The nice thing is that you can just keep adding things as you find them.

The kids LOVE the continent boxes. They can take one and sit down and go through the photos, play with the miniatures, read the books, and all the while learning so much. I hope to make some more boxes like these but in other subjects. 

And on one last note, some wise words from my dear father-in-law...


Wishing you a good week and an easy fast,
Always, 

Tuesday, January 3, 2012

Parshas Vayechi

I can confidently say that we are very proud supporters of Costco's Kirkland Baby-wipes and Kitchen wipes. I came across another mom blog out there and she brilliantly used the caps of these wipes to make a calendar for her kids.

Now a big goal of mine, being a Jewish homeschooling mom, is taking these awesome idea's and giving them a Jewish twist. So I started saving all the caps of all the wipes but just couldn't come up with a good idea of how to use them in a Jewish way.

Until.... this weeks parshah, where Yakov is blessing his 12 sons. I figured we could tie it all together and give each Shevet the color of their stone on the Kohen Gadols Choshen (High Priests Breast Plate) and then we could use this in a few weeks time again when we learn about the garments of the Kohanim and Kohen Gadol.

So here is how it went:

We hot glued a piece of felt to a card board box cover (one of those office boxes from Office Max). We then hot glued the caps of the wipes onto the felt like this:
Then each munchkin got 6 cards to color specific colors (the color of each Shevets stone)

We then glued the cards onto the tops of the caps and wrote each Shevets name on the correct color card, in order:
I then made a copy of the cover of My Parsah Reader- Sefer Bereishis and laminated it. We cut each one out and stuck a little Velcro sticker behind each one. Each picture depicts the blessing that Yakov gave each son:
HOW AWESOME IS THAT?? The kids LOVE using it and we talk about the different blessings and who got what and where it goes. Just looking at it is so enjoyable. And it was super easy.

Here is a cute little Menashe and Efraim project we made:

That's Yakov in the middle. We acted out the story of Yakov blessing them and switching his hands. That's Efraim on the left, my son made him "special" clothes since he got the first bracha.
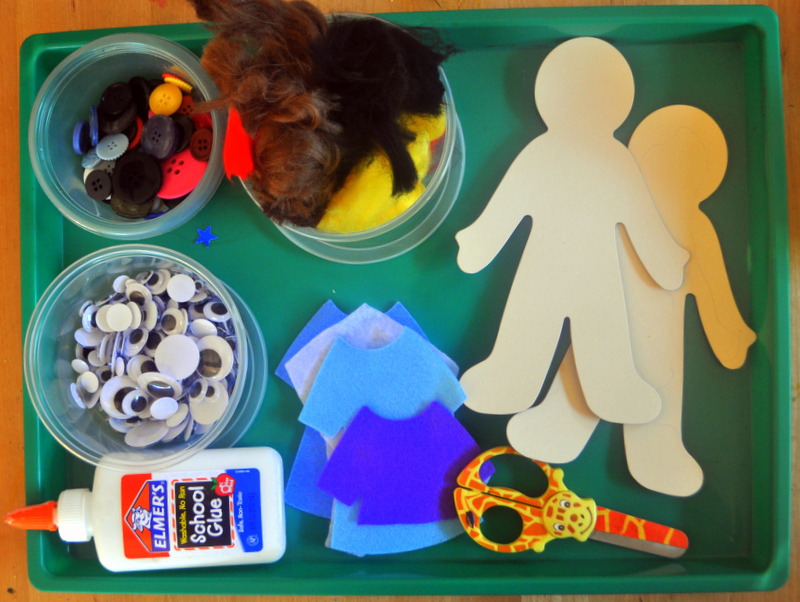
Here's another one we did- I just drew the outline of 2 men and the kiddos each colored and glued and stuck whatever they wanted on each man. The Alef is for Efraim and the Mem is for Menashe.
They then traced their hands and we were able to switch the hands to show how Yakov switched his hands.

And here's a really great Alef Beis project that my daughter LOVED. Just cut out colored strips, long and short but make sure they are all the same size. Use one long one and one short one to make templates of the Hebrew Alphabet and have the kids glue on the correct sticks to each letter.


And that's what we've been up to. Have a great week!

Monday, November 21, 2011

Some Pretty Cool Activities

We have a huge tub of crayons in the kitchen that the kids use to color and draw... inside that tub are tons of broken crayons that the kids just don't use and so thanks to the many awesome ideas out there in the blogosphere, this is what we did:

First, place them in a cupcake tin, I divided them into like colors, but you can mix them, either way is fine...

Put them in the oven at 400 for 10 minutes... only after I put them in the oven did I wonder if this would be a problem in the Kosher department- but I found out that since crayons are not food and these are non-toxic, that it is fine. Feel free to ask your own Rabbi if its okay to put wax crayons in your oven.

After 10 minutes, I took them out- they were completely liquid and marbled so I carefully put the tray of crayons in the fridge to harden. After about 15-20 minutes, they were hard and I pushed them out of the molds... and VOILA!
My 4 year old daughter has claimed them as her own, she piles them on top of each other, colors with them, traces around them- yes, it was a hit and I am looking for Alef Bet molds to make our next batch of crayons with. If anyone know where I can get them, let me know!

Okay, now this next little Science project we did was absolutely awesome.
It is all about Density in Liquids.

We took 4 liquids:
Honey
Dish Soap
Water with red food coloring
Oil

We poured the honey, then the dish soap, the water then the oil and this is what we got:

Note: we did it very carefully so not to mix the dish soap and the water. After a day the water started seeping into the dish soap. Someone suggested we try rubbing alcohol on top of the oil as it is less dense then oil and would rise above it. If anyone tries it, let me know, we didn't have any in the house.

Have a good one,

Monday, October 17, 2011

Torah, Torah, I Love You...

"Little Torah, Little Torah, Let me hold you tight!

Teach me, Teach me, all your mitzvot so I can do them right!

The Torah teaches every Jew, Torah, Torah, I Love You!"

Simchat Torah is such a fabulous Holiday- the reading of the Torah goes on portion by portion throughout the year, throughout the ages, in everlasting cycles. The Torah is concluded on Simchat Torah, but it is also immediately started again from the beginning. This shows that there is no end to the Torah and that it must be read and studied constantly, over and over again.

And so here are a few things we have been doing~ preparing for the great celebration!

We spoke about how a Torah is written on Parchment using a Quill and ink... then we used a feather and paint to create our own "quill and ink" experience:


Then, what started out as this project which I got from Chabad.org to make your own stuffed Torah from felt...

...turned into the most adorable Torah puppets- thanks to my 2 year old who found the Torahs drying on the table with the bottom part not yet sealed... he stuck his chubby little hands in and before we knew it, everyone had their own Torah puppet! It was such a hit- they made a whole puppet show singing all the Torah songs they know. So much for the little stuffed Torahs, but I guess there's always next year:)

Of course, we made Simchat Torah flags... and being the Montessori inspired mom that I am, I gave each munchkin a piece of white card-stock with a glue stick and put a box filled with all types of goodies in the middle of the table giving them the freedom to make their very own original creations...

Once completed, they went outside and each found a strong branch to use as the stick for the flag. We taped it on with strong packing tape and are keeping it on the wall until Simchat Torah.

Here's a little game that the munchkins actually made themselves. We used a paper plate and cut it into a smaller circle. Using a marker and a ruler (my big guy LOVES using rulers), we divided the circle into 6 sections. My big guy stuck little Torah Stickers in each section numbering 1-6. We then took paper clips and stuck the numbers 1-6 onto each one:

He then gave it to his little sister and explained to her how to clip the correct number on the paper clip to the correct amount of Torah's on the chart:

Good job kiddo!


Here are a few other toys and books we have been using in connection to Simchat Torah:

This is also a great link to adorable songs on each Parshah- and since we are starting at the very beginning next week, I thought some of you might enjoy using it as you teach each weeks Parshah to your little ones.

So hope you have a wonderful and happy Holiday,

Always,