Sunday, November 28, 2010

Latke Frying Pan, Size Sorting and Cute Printables

Here is a really cute project that we did today-


We took a paper plate and covered it with silver foil. Then attached a handle to it made out of Popsicle sticks stuck together covered in construction paper so it wouldn't bend when you hold the pan. We then cut out "latkes" out of white card stock and colored them yellow. We glued 2 latkes to the pan and attached one latke to the pan with a piece of string.

The munchkins had a ball "flipping" their latkes and trying to make it land on their frying pan!

We then did a size order activity which you can find here:

And a really cute Chanukah printable booklet made by Elizabeth at Creative Learning Fun can be found here- Enjoy and have a fabulous Chanukah!

Wednesday, November 24, 2010

I have a little Menorah, I made it out of clay:)

The great thing about this clay Menorah, is that the kids get to make it literally from scratch.

Here's the clay recipe:
3 cups flour
1 cup salt
1 cup water (plus a little extra if needed)

Mix all the ingredients together until it forms a nice smooth dough. I found that we needed to add some water along the way to get the smooth doughy consistency. The recipe said you can add food coloring but I found it just stained the kids hands when handling the dough which was not too exciting.

Preheat oven to 275.

Once we had our dough, we made a base for the menorah, made 8 round balls and used actual Chanukah candles to form little holes to put the candles in. Make sure to make the holes a bit bigger then the size of the candle, as it shrinks a drop in the oven. Use water to "glue" the holders to the base and the shamash.

Place menorah in the oven on wax paper for 1 hour.

After an hour, take it out and let it dry completely, then paint with acrylic paints. As you can see, ours turned into a finger painting session:)

Here's the finished product:


We then did dreidle sorting into the different colors with the little ones- I have a printable of colored dreidels here, feel free to use it-

This is what we did:


Wishing everyone a happy Turkey day:)

Monday, November 22, 2010

Homeschool Blog Awards - I Won:)

Thanks so much to all my amazing readers, friends and family for voting for my blog!

It feels really good to know that I have a great support system out there:)

Homeschooling is a lot of work, but I love it and I see such incredible results in my amazing little munchkins- I am so glad that you are able to share in our adventures in homeschooling!

So please continue to stop by and check out what we are up to- and keep that positive feedback coming:)

Thanks again,

Sunday, November 21, 2010

Some more Chanukah Printables and Ideas to keep Toddlers busy

Here are a few more Chanukah printables I made- I got all these ideas from the Curriculum of the Arts, a fabulous Jewish preschool curriculum geared toward both preschools, Hebrew schools and home schoolers. Click here to buy a copy!

I hope these printables are helpful and fun for your little ones!


Menorah Sequencing- cut out each card and put them in order of the candles, starting from 1-8

OIL handwriting worksheets - another fun idea is to use sidewalk chalk and write the word "oil" really large on the driveway and have the kids balance along each letter


Now I am sure there are many of you out there with a little one (under the age of 2) climbing all over you or the other kids while they are trying to get their work done:) Yes, I have one of those and have come up with a few things to keep him busy and feeling like one of the big kids while they do their activities.

Here are a few favorite toys that keep him stimulated and that buy me a few minutes, as well as books that he absolutely loves to read with me or any of the other kids:

Books: any books with large clear pictures of things that they are familiar with in their little world. Also, touch and feel books are a big hit, or lift the flaps


Toys: You don't even need fancy toys- stacking plastic cups, putting money into the pushkah, putting pompoms into a container, there are so many little activities to do, check out these resources: Tasks Galore and Tot Trays


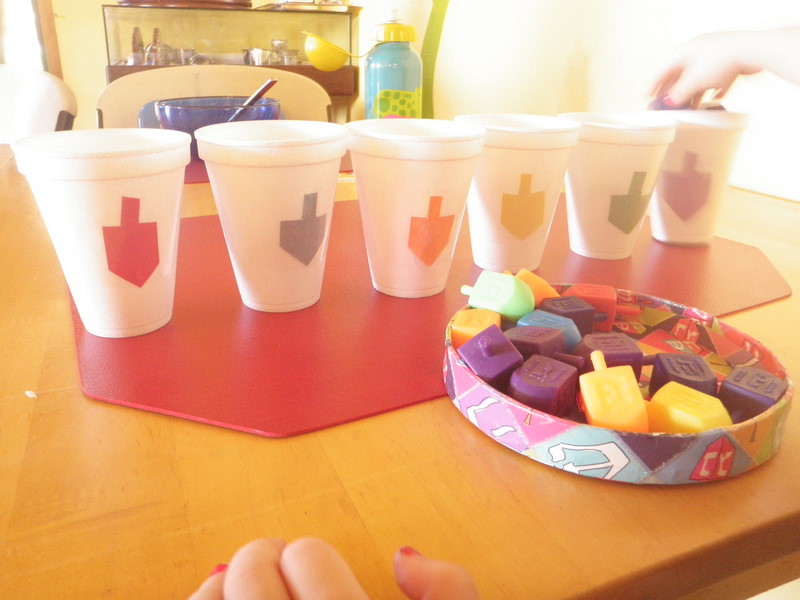
We did a project today on Yosefs coat- will post the photos when I get a chance. We also did some dreidle sorting which my 3 year old loved. Oh, and check out this link to a post I posted this time last year on what we were doing, as well as this list of fun and creative ideas to do for Chanukah.

Looking forward to hearing who the winners are for the Homeschool blog awards!

Have a fabulous week,

Wednesday, November 17, 2010

Menorah, Parshah Project and Workboxes

We made a project for this weeks Parshah, parshas VaYishlach. The munchkins colored a picture of Yakov meeting up with Eisav. Then we made a little wheel that pokes through a window on the paper showing the 3 things Yakov did to prepare to meet up with Eisav (prayed to Hashem - drew a Siddur, sent Eisav gifts- colored goats and sheep and prepared for war- colored bows and arrows). The little guy loves turning the wheel to see which picture shows up in the window...

Here is the full project:


This is just a little activity I did with Munchkin to help her practice coloring inside the lines:
Using pipe cleaners, I made them into shapes and glued them onto index cards. She then took markers and colored them in. She loved it:)
And here is just a peek inside our little Workboxes... I find it a great way to keep organized and to plan for each day:
The night before, I put a different activity in each drawer with any supplies they will need for the activity. Here are 3 examples:

A Beading Activity: I put the pipe cleaners shaped as dreidles with the beads in the drawer. The drawers come out, so I just put it out next to them.
A Chanukah Stamping Activity: Stamps, Ink pads and paper are all inside.
Menorah Activity: Paper, Popsicle sticks, tissue paper flames (under the paper) and glue...
One of our favorite activities is gluing- here is a little Menorah that we made out of the Popsicle sticks. I gave each munchkin a piece of colored construction paper with an outline of a Menorah. They each got Popsicle sticks and glue and glued each stick onto the line I drew. They then took yellow tissue paper and cut out flames to glue on... and voila:)

We also did a lot of practice with our Hebrew reading, as well as lots of singing and dancing to our favorite CD "Morah Music: Music and Movement"

We have a few of her CD's, the kids absolutely love them and all her songs of filled with information.

And so, thats been our week so far!
Oh, and today is the LAST day to vote for me in the Homeschool Blog Awards, so if you haven't yet voted (and if you have, thanks!!!) please take a minute, and vote for me! Vote Here!
My blog is titled "A Jewish Homeschool Blog."
Wishing you all a wonderful Shabbos,

Monday, November 15, 2010

My Chanukah Activity Pack

I know Chanukah is not for a few more weeks, but I made this little Activity pack for my munchkins now since as Chanukah approaches, it seems that between the party planning and the latke frying, there really isn't much time for too many other things!

So feel free to download it for your munchkins and enjoy. It is geared toward little ones, ages 2-5.


And for those of you who make Lapbooks, I am sure you can use some of the pages for your "Chanukah Lapbook."

Have a great week,

Tuesday, November 9, 2010

Parshas VaYeitzei, Building words and Hebrew Reading

Today we did a really fun project, especially since I literally thought of it on the spot:) It incorporated the 3 things the little tykes love most when it comes to art projects: cutting, gluing and manipulating the picture. So this is what we did:

We made a picture of Yakov having his dream. For the ladder, they used Popsicle sticks and glued them down to create their own ladder. Then they cut out 12 stones and glued them down to make a "pillow" for Yakovs head. They then cut out a picture of Yakov sleeping (I drew it for each of them) and stuck him down with his head resting on the "pillow."
The coolest part came next:) We taped a thin piece of string to the top of the ladder and bottom. We made a little Malach (angel) and attached it to the string so he is able to go up and down.

And there you have Yakovs dream! They absolutely loved pushing the little Malach up and down, it was a real hit!
I then came up with this activity to help the little guy practice putting the Hebrew letters and vowels together to form words as well as work on Hebrew vocabulary.

We are starting with 2 letter words and the vowel "kamatz." I wrote the words on little index cards and wrote the letters with the vowel on pegs. The little guy then matches the letters together, forming a word. Once he sounds out the word, he picks the toy to which the word matches (translation). Its such a fabulous activity and so easy to make. As he gets more fluent with his reading, the words will get bigger with more vowels etc.

Here it is:
And here he is, practicing his English words using the classic Montessori style- also a big hit, he gets SO excited when he creates sentences, its adorable:)
And that was our day! Don't forget to stop by the Homeschool Blog Awards website if you haven't already and vote for my blog! Vote Here!

Thanks, and a great week to all~

Sunday, November 7, 2010

Homeschool Blog Awards Nominee

Our Jewish Homeschool Blog has been up and running since July 2010- just 4 months old:) I love posting (when ever I get a chance!) and love checking out all the other amazing Homeschooling blogs out there. I get so inspired by so many incredible moms with their awesome ideas and I hope to inspire others through my blog too:)

Its always so exciting when I get comments and see who has visited my blog and from where. Homeschooling is such an adventure and having the ability to share this adventure is just fabulous!

So I discovered the Homeschool Blog Awards and see that I was nominated! There are some great prizes and this looks like its going to be a lot of fun- so take a minute, and vote for me!

You can vote now until November 18th. My blog is titled "A Jewish Homeschool Blog."
Thanks in advance!
VOTE HERE!

Wednesday, November 3, 2010

Nancy Larson Science 1 Homeschool Kit Review

I was given the privilege of reviewing the Nancy Larson Science 1 Homeschool Kit. We received the box in the mail and were so excited to open it up to see all the goodies inside!

This is what we found:
Pine cones, tree cookie, hand lens, x-ray set, Live Butterfly Garden with Butterfly Larvae Coupon, Ladybug Land with Ladybug Larvae Coupon, insect learning cards, plastic insects and spiders set, and the following books: What Do Scientists Do?, Peterson First Guide to Trees,Trees to Paper, Familiar Insects and Spiders, Your Insides, and The Seasons of Arnold's Apple Tree.

Included was an amazing teachers manual containing the lessons and answer keys. The lessons are presented in dialogue form which I really like, as it presents each lesson so clearly and simply for the little ones to truly grasp and understand it all.
It also has student booklets and assessment sheets, once again, very clear and very simple to use making the material very easy to understand for the kids.

And last but not least, a special CD loaded with photos, glossaries, word cards, science word labels, teacher's masters, and other materials to help you teach.

The curriculum covers the following:

  • Developmental Biology—Describing the Life Stages of Human Beings
  • Botany—Observing Trees
  • Earth and Space—Exploring Sunlight, Water, and Soil
  • Zoology—Investigating Animals and Their Habitats
  • Anatomy—Discovering What Is Inside Our Bodies
  • Entomology—Examining the Characteristics and Life Cycles of Insects

I liked that the subjects it covered are really the subjects that interest the kids. They can really relate to all of them and they are brought down to a level that the kids really get it.

We covered Developmental Biology, which the little ones really enjoyed and fully understood.

We then skipped on to Anatomy which just fascinated them. They loved the true to size X-ray cards which gave them a really clear picture of what their bones look like inside. And the lesson plans were so great and easy to teach. We have read the book "Your Insides" included in the kit, at least a dozen times. It is a fabulous book that gives great info on a very simple level. Ask my 5 year old what happens when you eat food and he will give you a full account. Its really sweet seeing the little guy using words like "esophagus" and "intestines":) And he gets it!

But I have to say, one of the highlights of the kit, of course, is the Butterfly Garden! Unfortunately, where we live, we couldn't get the butterfly Larvae shipped to us, so we opted for the next best thing... silkworms! And there is an entire section on the differences and similarities between butterflies and moths, check out the photo below of us discussing it:


Our silkworm garden:)

I just love the way the information in given over, I wish they had every subject layed out like this. Here is a link to an example of one of the lessons: http://nancylarson.com/sample_lessons/s1sample1.pdf

So all in all, I really like this Homeschool Kit. It is so user friendly, has lots of great information and hands on activities and is just easy and simple to use and understand.

Here is a direct link to their website:

http://www.nancylarson.com/science1.html

Go check it out!


Related Posts Plugin for WordPress, Blogger...